
master node 2대를 추가해 H.A 구성을 해보자.
[ 방법 ]
- 트래픽을 받도록 load balancer로 배포한다. HAProxy는 배포가 쉬운편이다. start하여 현재 동작중인 master node를 확인한다.
- k8smaster2,3번 노드에 kubernetes software를 설치한다. (이 과정은 기존 worker node를 이미지 떠서 만들면 더 편할 듯하다.)
- k8smaster2번을 master node에 join 한다. 기존에 worker node 추가때 사용하던 kubeadm join 으로 부터 추가적으로 hash와 flag가 필요할 것이다.
- k8smaster3번을 master node에 join 한다.
- haproxy에 3개의 master를 사용하도록 설정을 수정하여 재시작한다.
- 트래픽 및 모니터링 화면을 통해 제대로 분배되어 들어오는지 확인한다.
[ 준비사항 ]
- 3개의 노드 준비 (proxy node, k8smaster2, k8smaster3)
haproxy, master2, master3 세팅
1
2
3
4
5
6
7
8
9
10
11
12
13
14
15
16
17
18
19
20
21
22
23
24
25
26
27
28
29
30
31
32
33
34
35
36
37
# 계정 추가 및 세팅
$ useradd -s /bin/bash -m ps0107

$ passwd ps0107

$ vi /etc/sudoers.d/ps0107
  ps0107 ALL=(ALL) ALL

$ chmod 440 /etc/sudoers.d/ps0107

$ vi /etc/sudoers
  %sudo   ALL=(ALL:ALL) NOPASSWD: ALL

$ vi /etc/ssh/sshd_config
  PasswordAuthentication yes

$ service ssh restart

$ vi /etc/hosts
10.146.0.2   k8smaster   master
10.146.0.13  k8smaster2  master2
10.146.0.14  k8smaster3  master3
10.146.0.4   k8sworker1  worker1

$ apt-get update && apt-get upgrade -y

#### master2,3번은 docker 및 kubernetes software 설치
$ apt-get install -y docker.io

$ vi /etc/apt/sources.list.d/kubernetes.list
  deb http://apt.kubernetes.io/ kubernetes-xenial main

$ curl -s https://packages.cloud.google.com/apt/doc/apt-key.gpg | apt-key add -

$ apt-get update

$ apt-get install -y kubeadm=1.15.1-00 kubelet=1.15.1-00 kubectl=1.15.1-00
haproxy 설치
1
2
3
4
5
6
7
8
9
10
11
12
13
14
15
16
17
18
19
20
21
22
23
24
25
26
27
28
29
30
31
32
33
34
35
36
37
38
39
40
41
42
43
44
45
46
47
48
49
50
51
52
53
54
55
56
57
58
59
60
61
62
63
64
65
66
67
68
69
70
71
72
73
74
75
76
77
78
79
80
81
82
83
84
85
86
87
88
###################################
# haproxy 설치
###################################
# haproxy install
ps0107@proxy:~$ sudo apt-get update ; sudo apt-get install -y apache2 haproxy

# haproxy 설정 변경
ps0107@proxy:~$ sudo vi /etc/haproxy/haproxy.cfg
global
	log /dev/log	local0
	log /dev/log	local1 notice
	chroot /var/lib/haproxy
	stats socket /run/haproxy/admin.sock mode 660 level admin
	stats timeout 30s
	user haproxy
	group haproxy
	daemon

	# Default SSL material locations
	ca-base /etc/ssl/certs
	crt-base /etc/ssl/private

	# Default ciphers to use on SSL-enabled listening sockets.
	# For more information, see ciphers(1SSL). This list is from:
	#  https://hynek.me/articles/hardening-your-web-servers-ssl-ciphers/
	ssl-default-bind-ciphers ECDH+AESGCM:DH+AESGCM:ECDH+AES256:DH+AES256:ECDH+AES128:DH+AES:ECDH+3DES:DH+3DES:RSA+AESGCM:RSA+AES:RSA+3DES:!aNULL:!MD5:!DSS
	ssl-default-bind-options no-sslv3

defaults
	log	global
	mode	tcp
	option	tcplog
	option	dontlognull
        timeout connect 5000
        timeout client  50000
        timeout server  50000
	errorfile 400 /etc/haproxy/errors/400.http
	errorfile 403 /etc/haproxy/errors/403.http
	errorfile 408 /etc/haproxy/errors/408.http
	errorfile 500 /etc/haproxy/errors/500.http
	errorfile 502 /etc/haproxy/errors/502.http
	errorfile 503 /etc/haproxy/errors/503.http
	errorfile 504 /etc/haproxy/errors/504.http

frontend proxynode
   bind *:80
   bind *:6443
   stats uri /proxystats
   default_backend k8sServers

backend k8sServers
   balance roundrobin
   server master1  10.146.0.2:6443 check
#  server master2  10.128.0.30:6443 check
#  server master3  10.128.0.66:6443 check

listen stats
     bind :9999
     mode http
     stats enable
     stats hide-version
     stats uri /stats

# 설정 변경 후 재시작
ps0107@proxy:~$ sudo service haproxy restart

# 재시작 및 상태 확인
ps0107@proxy:~$ sudo service haproxy status
● haproxy.service - HAProxy Load Balancer
   Loaded: loaded (/lib/systemd/system/haproxy.service; enabled; vendor preset: enabled)
   Active: active (running) since Tue 2020-02-18 06:02:59 UTC; 9s ago
     Docs: man:haproxy(1)
           file:/usr/share/doc/haproxy/configuration.txt.gz
  Process: 4116 ExecStartPre=/usr/sbin/haproxy -f $CONFIG -c -q $EXTRAOPTS (code=exited, status=0/SUCCESS)
Main PID: 4118 (haproxy-systemd)
    Tasks: 3 (limit: 4915)
   CGroup: /system.slice/haproxy.service
           ├─4118 /usr/sbin/haproxy-systemd-wrapper -f /etc/haproxy/haproxy.cfg -p /run/haproxy.pid
           ├─4121 /usr/sbin/haproxy-master
           └─4122 /usr/sbin/haproxy -f /etc/haproxy/haproxy.cfg -p /run/haproxy.pid -Ds

Feb 18 06:02:59 proxy systemd[1]: Starting HAProxy Load Balancer...
Feb 18 06:02:59 proxy systemd[1]: Started HAProxy Load Balancer.
Feb 18 06:02:59 proxy haproxy-systemd-wrapper[4118]: haproxy-systemd-wrapper: executing /usr/sbin/haproxy -f /etc/haproxy/haproxy.cfg -p /run/haproxy.pid -Ds
Feb 18 06:02:59 proxy haproxy[4121]: Proxy proxynode started.
Feb 18 06:02:59 proxy haproxy[4121]: Proxy proxynode started.
Feb 18 06:02:59 proxy haproxy[4121]: Proxy k8sServers started.
Feb 18 06:02:59 proxy haproxy[4121]: Proxy k8sServers started.
haproxy 동작 확인 (현재는 master1번만 backend)
1
2
3
4
5
6
7
8
9
10
11
12
13
14
15
16
17
# 이제 master1의 hosts파일을 수정하여 k8smaster가 haproxy 로 가도록 아이피를 수정해준다.
# haproxy 에서 현재 설정된대로 master1번 으로 호출하게 될것이다.
# hosts파일 수정
ps0107@k8smaster1:~/.ssh$ cat /etc/hosts
127.0.0.1 localhost
#10.146.0.2 k8smaster master
10.146.0.9 k8smaster master
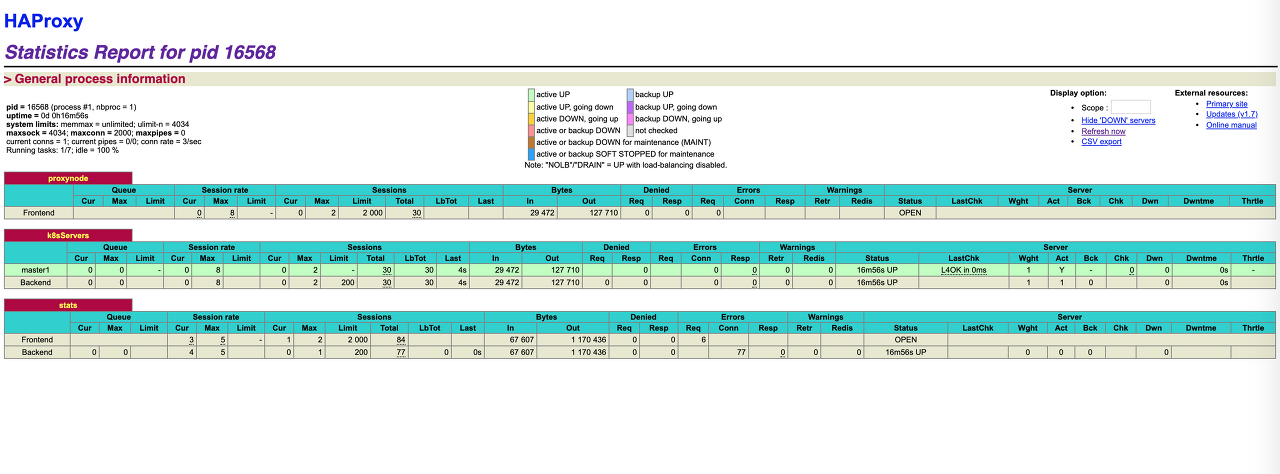
# haproxy stats 웹페이지 접속
http://35.243.70.115:9999/stats
# kubectl 명령을 여러번 호출 한 후 웹페이지를 확인해 본다.
ps0107@k8smaster1:~/lab/LFS458/SOLUTIONS/s_16$ kubectl get node
NAME STATUS ROLES AGE VERSION
k8smaster1 Ready master 21d v1.15.1
k8sworker1 Ready <none> 21d v1.15.1
- http://35.243.70.115:9999/stats 로 접속하면 HAProxy Status 화면을 볼수 있다.
- 현재는 master node 1개가 backend로 연결되어 있다.
master 1번 노드에서 token 과 SSL hash 생성
1
2
3
4
5
6
7
8
9
10
11
12
13
14
15
16
17
18
19
20
21
22
23
24
25
###############################################
# master 1번 노드에서 token 과 SSL hash 생성
###############################################
# 조인을 위해 master1번서버에서 token들과 hash

# master1번 아이피를 haproxy 서버 아이피로 변경한다
ps0107@k8smaster2:~$ sudo vi /etc/hosts

# master1번 서버에서 token 생성
ps0107@k8smaster1:~$ sudo kubeadm token create
nmub4r.x6pnwhwicqosxtbn

# SSL hash 생성
ps0107@k8smaster1:~$ openssl x509 -pubkey \
> -in /etc/kubernetes/pki/ca.crt | openssl rsa \
> -pubin -outform der 2>/dev/null | openssl dgst \
> -sha256 -hex | sed 's/^.* //'
16e1304347fa2f5cb6f1660e582ed3501aa63e0ddce276773566098aef13d0ba

# worker node가 아니라 master node로 join 하기 위해 신규 master certificate를 생성한다.
ps0107@k8smaster1:~$ sudo kubeadm init phase upload-certs --upload-certs
I0219 01:57:13.393987    9787 version.go:248] remote version is much newer: v1.17.3; falling back to: stable-1.15
[upload-certs] Storing the certificates in Secret "kubeadm-certs" in the "kube-system" Namespace
[upload-certs] Using certificate key:
d3bc0cd2c943fafe26e0dc5903ae41669993b7cbfbb7c4b5cc6336bb99a2e365
master 2번 노드에서 master로 클러스터 조인 수행
1
2
3
4
5
6
7
8
9
10
11
12
13
14
15
16
17
18
19
20
21
22
23
24
25
26
27
28
29
30
31
32
33
34
35
36
37
38
39
40
41
42
43
44
45
46
47
48
49
50
51
52
53
54
55
56
57
58
59
60
61
62
63
64
65
66
67
68
69
70
71
72
73
74
75
76
77
78
79
80
81
82
83
84
85
86
87
88
89
90
91
92
93
94
95
96
97
98
99
100
101
102
103
104
105
106
107
108
109
110
111
112
113
114
###############################################
# master 2번 노드에서 master로 클러스터 조인 수행
###############################################
# master2번 노드에서 join 수행
ps0107@k8smaster2:~$ sudo kubeadm join k8smaster:6443 ₩
> --token nmub4r.x6pnwhwicqosxtbn ₩
> --discovery-token-ca-cert-hash sha256:16e1304347fa2f5cb6f1660e582ed3501aa63e0ddce276773566098aef13d0ba ₩
> --control-plane --certificate-key d3bc0cd2c943fafe26e0dc5903ae41669993b7cbfbb7c4b5cc6336bb99a2e365

[preflight] Running pre-flight checks
[WARNING IsDockerSystemdCheck]: detected "cgroupfs" as the Docker cgroup driver. The recommended driver is "systemd". Please follow the guide at https://kubernetes.io/docs/setup/cri/
[preflight] Reading configuration from the cluster...
[preflight] FYI: You can look at this config file with 'kubectl -n kube-system get cm kubeadm-config -oyaml'
[preflight] Running pre-flight checks before initializing the new control plane instance
[preflight] Pulling images required for setting up a Kubernetes cluster
[preflight] This might take a minute or two, depending on the speed of your internet connection
[preflight] You can also perform this action in beforehand using 'kubeadm config images pull'
[download-certs] Downloading the certificates in Secret "kubeadm-certs" in the "kube-system" Namespace
[certs] Using certificateDir folder "/etc/kubernetes/pki"
[certs] Generating "etcd/healthcheck-client" certificate and key
[certs] Generating "etcd/server" certificate and key
[certs] etcd/server serving cert is signed for DNS names [k8smaster2 localhost] and IPs [10.146.0.13 127.0.0.1 ::1]
[certs] Generating "apiserver-etcd-client" certificate and key
[certs] Generating "etcd/peer" certificate and key
[certs] etcd/peer serving cert is signed for DNS names [k8smaster2 localhost] and IPs [10.146.0.13 127.0.0.1 ::1]
[certs] Generating "apiserver-kubelet-client" certificate and key
[certs] Generating "apiserver" certificate and key
[certs] apiserver serving cert is signed for DNS names [k8smaster2 kubernetes kubernetes.default kubernetes.default.svc kubernetes.default.svc.cluster.local k8smaster] and IPs [10.96.0.1 10.146.0.13]
[certs] Generating "front-proxy-client" certificate and key
[certs] Valid certificates and keys now exist in "/etc/kubernetes/pki"
[certs] Using the existing "sa" key
[kubeconfig] Generating kubeconfig files
[kubeconfig] Using kubeconfig folder "/etc/kubernetes"
[kubeconfig] Writing "admin.conf" kubeconfig file
[kubeconfig] Writing "controller-manager.conf" kubeconfig file
[kubeconfig] Writing "scheduler.conf" kubeconfig file
[control-plane] Using manifest folder "/etc/kubernetes/manifests"
[control-plane] Creating static Pod manifest for "kube-apiserver"
[control-plane] Creating static Pod manifest for "kube-controller-manager"
[control-plane] Creating static Pod manifest for "kube-scheduler"
[check-etcd] Checking that the etcd cluster is healthy
[kubelet-start] Downloading configuration for the kubelet from the "kubelet-config-1.15" ConfigMap in the kube-system namespace
[kubelet-start] Writing kubelet configuration to file "/var/lib/kubelet/config.yaml"
[kubelet-start] Writing kubelet environment file with flags to file "/var/lib/kubelet/kubeadm-flags.env"
[kubelet-start] Activating the kubelet service
[kubelet-start] Waiting for the kubelet to perform the TLS Bootstrap...
[etcd] Announced new etcd member joining to the existing etcd cluster
[etcd] Wrote Static Pod manifest for a local etcd member to "/etc/kubernetes/manifests/etcd.yaml"
[etcd] Waiting for the new etcd member to join the cluster. This can take up to 40s
[upload-config] Storing the configuration used in ConfigMap "kubeadm-config" in the "kube-system" Namespace
[mark-control-plane] Marking the node k8smaster2 as control-plane by adding the label "node-role.kubernetes.io/master=''"
[mark-control-plane] Marking the node k8smaster2 as control-plane by adding the taints [node-role.kubernetes.io/master:NoSchedule]

This node has joined the cluster and a new control plane instance was created:

* Certificate signing request was sent to apiserver and approval was received.
* The Kubelet was informed of the new secure connection details.
* Control plane (master) label and taint were applied to the new node.
* The Kubernetes control plane instances scaled up.
* A new etcd member was added to the local/stacked etcd cluster.

To start administering your cluster from this node, you need to run the following as a regular user:

mkdir -p $HOME/.kube
sudo cp -i /etc/kubernetes/admin.conf $HOME/.kube/config
sudo chown $(id -u):$(id -g) $HOME/.kube/config

Run 'kubectl get nodes' to see this node join the cluster.

# config file 복사
ps0107@k8smaster2:~$ mkdir -p $HOME/.kube
ps0107@k8smaster2:~$ sudo cp -i /etc/kubernetes/admin.conf $HOME/.kube/config
ps0107@k8smaster2:~$ sudo chown $(id -u):$(id -g) $HOME/.kube/config

# master 1번에서 node 리스트를 확인해보자.
# 정상적으로 2번 마스트노드가 조인된걸 확인할수 있다. 3번도 같은 방법으로 수행한다.
ps0107@k8smaster1:~$ kubectl get nodes
NAME         STATUS   ROLES    AGE     VERSION
k8smaster1   Ready    master   21d     v1.15.1
k8smaster2   Ready    master   4m15s   v1.15.1
k8sworker1   Ready    <none>   21d     v1.15.1

# etcd pod도 조회해본다.
ps0107@k8smaster1:~$ kubectl -n kube-system get pods | grep etcd
etcd-k8smaster1                      1/1     Running   0          21d
etcd-k8smaster2                      1/1     Running   0          117m

# 새로 생긴 etcd pod의 로그를 확인해 본다.
ps0107@k8smaster1:~$ kubectl -n kube-system logs -f etcd-k8smaster2
......
2020-02-19 03:28:08.167787 I | etcdserver: start to snapshot (applied: 2930857, lastsnap: 2920856)
2020-02-19 03:28:08.173395 I | etcdserver: saved snapshot at index 2930857
2020-02-19 03:28:08.174123 I | etcdserver: compacted raft log at 2925857
2020-02-19 03:30:02.972421 I | mvcc: store.index: compact 2528020
2020-02-19 03:30:02.973830 I | mvcc: finished scheduled compaction at 2528020 (took 1.034404ms)

# etcd pod에 들어가서 cluster status를 체크해보자.
ps0107@k8smaster1:~$ kubectl -n kube-system  exec -it etcd-k8smaster1 -- /bin/sh

# 아래 명령으로 조회해 본다.
# master1 etcd 가 리더로 설정되어 있다.
ETCDCTL_API=3 etcdctl -w table ₩
--endpoints 10.146.0.2:2379,10.146.0.13:2379 ₩
--cacert /etc/kubernetes/pki/etcd/ca.crt ₩
--cert /etc/kubernetes/pki/etcd/server.crt ₩
--key /etc/kubernetes/pki/etcd/server.key ₩
endpoint status

+------------------+------------------+---------+---------+-----------+-----------+------------+
|     ENDPOINT     |        ID        | VERSION | DB SIZE | IS LEADER | RAFT TERM | RAFT INDEX |
+------------------+------------------+---------+---------+-----------+-----------+------------+
|  10.146.0.2:2379 | 7a2c7e572714edd4 |  3.3.10 |  5.3 MB |      true |         6 |    2936615 |
| 10.146.0.13:2379 | fb2d7152d16646c3 |  3.3.10 |  5.3 MB |     false |         6 |    2936615 |
+------------------+------------------+---------+---------+-----------+-----------+------------+
- 윽.. gcp 사용중인데 한 리즌에 cpu 리밋이 8개라 더이상 인스턴스 생성이 불가하네요~
- 일단 그냥 한대 master 붙인걸로 테스트 해봐야겠네요.
- http://35.243.70.115:9999/stats 접속하여 정상 적으로 분배되어 들어가는지 확인한다.
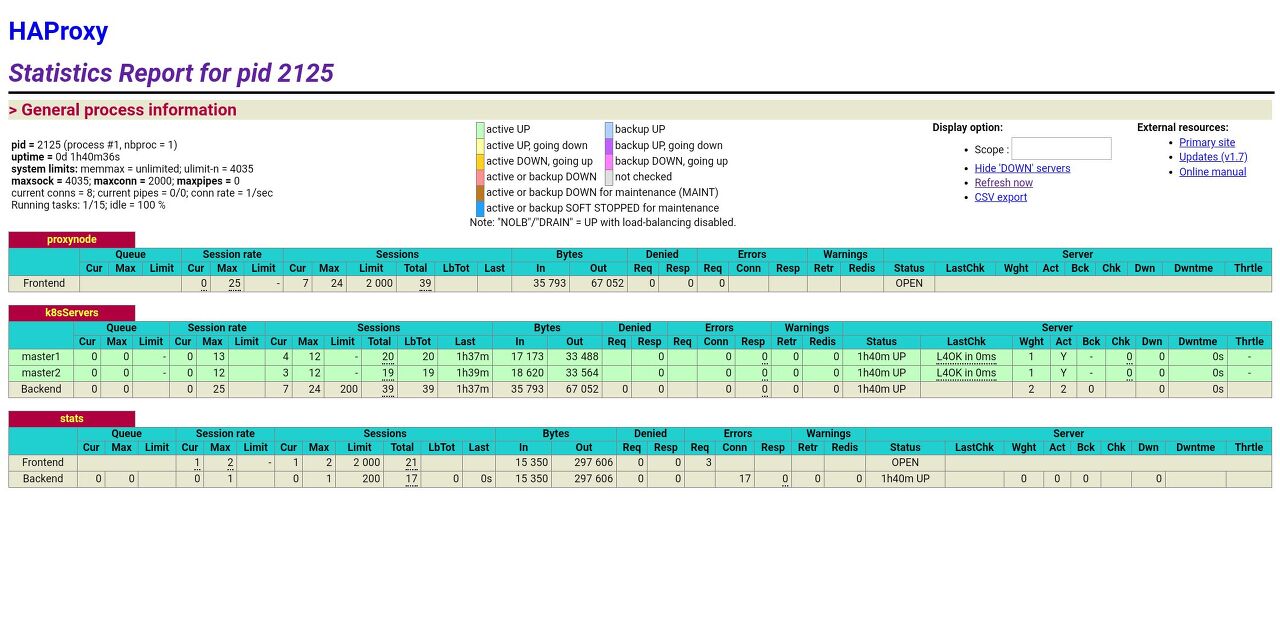
현재 노드한개가 추가된 걸 볼수 있다.
FailOver 테스트 해보자.
1
2
3
4
5
6
7
8
9
10
11
12
13
14
15
16
17
18
19
20
21
22
23
24
25
26
27
28
29
30
31
32
33
34
35
36
37
38
39
40
41
42
43
44
45
###############################################
# FailOver 테스트 해보자.
###############################################

# master 1번 서버에서 docker service를 내려보자.
ps0107@k8smaster1:~$ sudo service docker stop

# etcd 로그를 확인해보자.
# master1번 etcd 에 대한 connection을 잃었다.
ps0107@k8smaster1:~$ kubectl -n kube-system logs -f etcd-k8smaster2
.....
2020-02-19 04:20:17.075534 I | raft: fb2d7152d16646c3 became leader at term 7
2020-02-19 04:20:17.075554 I | raft: raft.node: fb2d7152d16646c3 elected leader fb2d7152d16646c3 at term 7
2020-02-19 04:20:17.170081 W | rafthttp: lost the TCP streaming connection with peer 7a2c7e572714edd4 (stream Message reader)
2020-02-19 04:20:17.170267 W | rafthttp: lost the TCP streaming connection with peer 7a2c7e572714edd4 (stream MsgApp v2 reader)
2020-02-19 04:20:17.192833 E | rafthttp: failed to dial 7a2c7e572714edd4 on stream Message (EOF)
2020-02-19 04:20:17.192864 I | rafthttp: peer 7a2c7e572714edd4 became inactive (message send to peer failed)
2020-02-19 04:20:17.454474 W | rafthttp: lost the TCP streaming connection with peer 7a2c7e572714edd4 (stream Message writer)
2020-02-19 04:20:19.054260 W | raft: fb2d7152d16646c3 stepped down to follower since quorum is not active

# kubectl 명령은 잘 수행된다.
# master1번이 not ready 상태로 변경되었다.
ps0107@k8smaster1:~$ kubectl get nodes
NAME         STATUS     ROLES    AGE    VERSION
k8smaster1   NotReady   master   21d    v1.15.1
k8smaster2   Ready      master   138m   v1.15.1
k8sworker1   NotReady   <none>   21d    v1.15.1

# etcd를 접속해 cluster 상태를 확인해본다.
# 리더가 master2 etcd로 변경되었다.
ps0107@k8smaster1:~$ kubectl -n kube-system  exec -it etcd-k8smaster2 -- /bin/sh

ETCDCTL_API=3 etcdctl -w table ₩
--endpoints 10.146.0.2:2379,10.146.0.13:2379 ₩
--cacert /etc/kubernetes/pki/etcd/ca.crt ₩
--cert /etc/kubernetes/pki/etcd/server.crt ₩
--key /etc/kubernetes/pki/etcd/server.key ₩
endpoint status

+------------------+------------------+---------+---------+-----------+-----------+------------+
|     ENDPOINT     |        ID        | VERSION | DB SIZE | IS LEADER | RAFT TERM | RAFT INDEX |
+------------------+------------------+---------+---------+-----------+-----------+------------+
|  10.146.0.2:2379 | 7a2c7e572714edd4 |  3.3.10 |  5.3 MB |     false |        10 |    2937708 |
| 10.146.0.13:2379 | fb2d7152d16646c3 |  3.3.10 |  5.3 MB |      true |        10 |    2937708 |
+------------------+------------------+---------+---------+-----------+-----------+------------+
- http://35.243.70.115:9999/stats 접속하여 노드 상태를 확인할 수 있다.
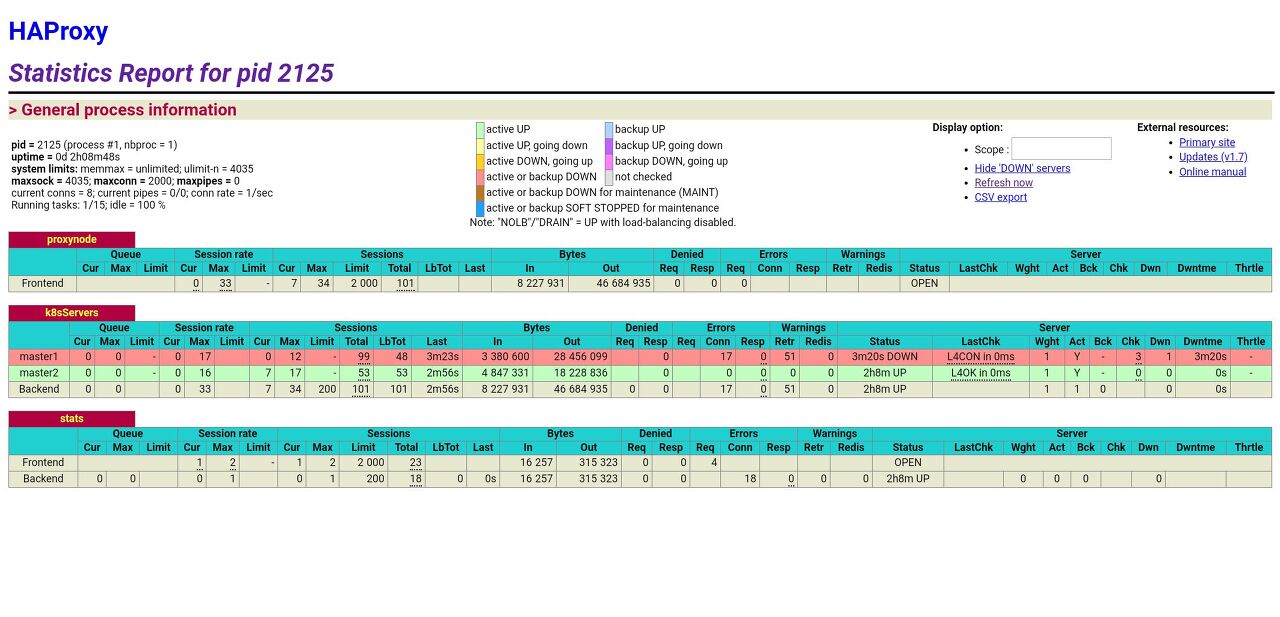
- 노드상태를 볼수 있다. docker service를 내린 후 fail 상태를 볼수 있다.
이제 다시 master1번 노드를 정상화 하여 본다.
1
2
3
4
5
6
7
8
9
10
11
12
13
14
15
16
17
18
19
20
21
# 이제 다시 master1번 서버의 docker service를 시작해 보자.
ps0107@k8smaster1:~$ sudo service docker start

# 정상적으로 Ready 상태로 변경되었다.
ps0107@k8smaster1:~$ kubectl get node
NAME         STATUS   ROLES    AGE    VERSION
k8smaster1   Ready    master   21d    v1.15.1
k8smaster2   Ready    master   142m   v1.15.1
k8sworker1   Ready    <none>   21d    v1.15.1

http://35.243.70.115:9999/stats 접속하여 노드 상태를 확인할 수 있다.

# etcd 로그르 확인해보자.
# master1번 etcd가 active 되었음을 확인할 수 있다.
ps0107@k8smaster1:~$ kubectl -n kube-system logs -f etcd-k8smaster2
.....
2020-02-19 04:27:41.728243 I | rafthttp: peer 7a2c7e572714edd4 became active
2020-02-19 04:27:41.728282 I | rafthttp: established a TCP streaming connection with peer 7a2c7e572714edd4 (stream MsgApp v2 reader)
2020-02-19 04:27:41.729772 I | rafthttp: established a TCP streaming connection with peer 7a2c7e572714edd4 (stream Message reader)
2020-02-19 04:27:41.741347 W | rafthttp: closed an existing TCP streaming connection with peer 7a2c7e572714edd4 (stream MsgApp v2 writer)
.....
- http://35.243.70.115:9999/stats 접속하여 노드 상태를 확인할 수 있다.
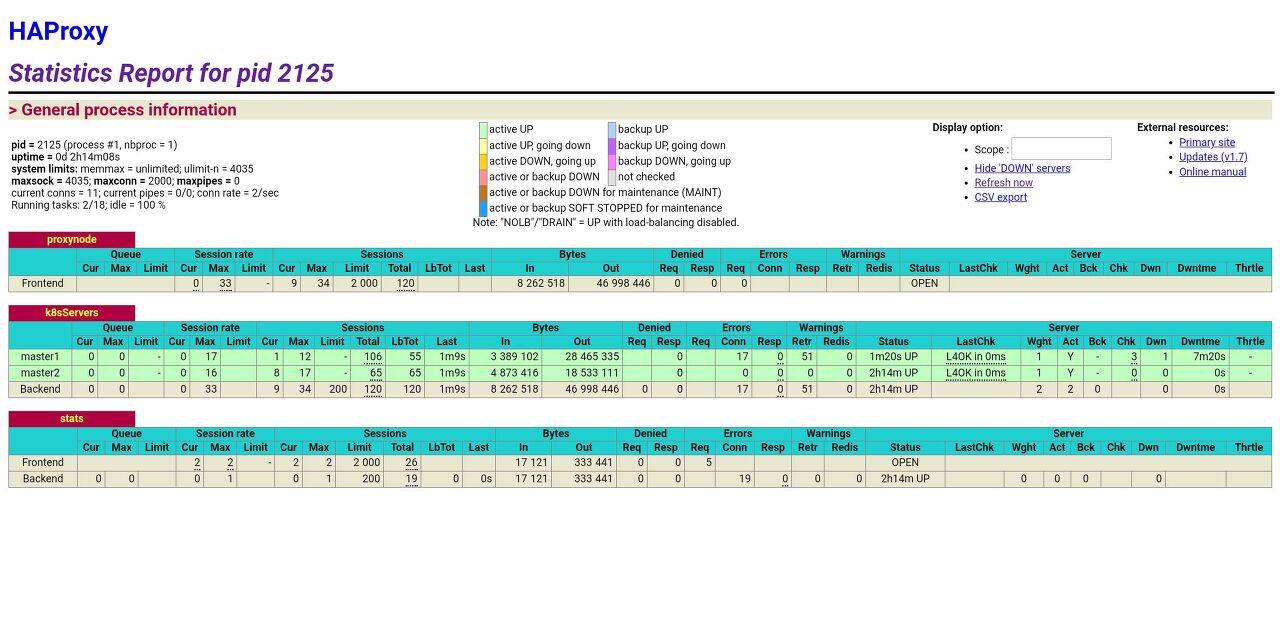
두개 노드다 정상화 된것을 확인할 수 있다.